

The principle of wiring a DCC layout is simple- supply power to all areas of the layout, avoiding the possibility of any short circuits.
The first thing to do, which really needs to be considered before laying any track, is the placement of isolating rail joiners. ‘But what’s this!’ I hear you cry, ‘he said there was no need to split the track into sections!’ This is very true, however we must sometimes use isolating rail joiners to prevent the two rails touching each other. This can happen with live frog points, and sometimes with dead frog points as well (I’ll explain about dead frog points later on)
The most common situation where short circuits can occur is points. Use any live frog (electrofrog) point without insulated joiners and you are pretty much guaranteed a short circuit. The solution is very simple, and is shown below.
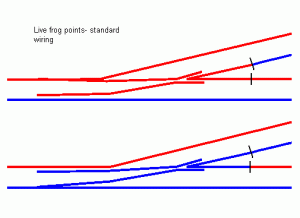
You can see where shorts would occur. Both rails on the non-selected track have the same polarity. The presence of any power feed beyond the point results in red meeting blue, and hence a short circuit. However, correcting this is very simple. Two isolating rail joiners must be placed on the inner ‘vee’ rails as shown in black. Follow this simple rule and there will be no short circuits. Of course, this means that on an ordinary crossover, both rails will be isolated where the points meet, but it all boils down to the same rule.
To maintain continuity, we must also add extra power feeds to the tracks coming from the point. Theoretically, one only needs to do this to the inner rails, but it doesn’t hurt and is good practice to add them to the outer rails as well.
Dead frog points:
While I always recommend live frog pointwork, sometimes you have no option but to use dead frogs (if you are using peco setrack or hornby for example) In which case, I recommend using insulated joiners as for live frog points. While normally you would not do this (they are supposedly simpler to wire) you can sometimes get problems occurring when a metal wheel bridges the insulated gap at the crossing. This causes a short circuit as both rails are powered due to ‘back feeding.’ Using insulated joiners will remedy this as shown. You might lay dead frog points without insulated joiners and never get a problem, but it’s far better to take a thorough approach than have to alter things later on if problems arise. Remember though; this is not a DCC-only technique, and is equally applicable to DC layouts in places where the point is powered from both ends (for example, where a siding branches off from a main line)
‘DCC friendly’ points:
Here’s another myth- you need special points for DCC operation. This is somewhat misleading. When people convert their existing DC layout to DCC, you sometimes hear stories about how their system shuts down when trains pass over the points, and DCC gets blamed for this.
However, the short circuits that cause the shutdown were in fact occurring under DC anyway. Because DCC uses more complex electronics within controllers (compared to some DC controllers which can be a simple rheostat and switch) the short circuit detection is more refined and acts quicker. This means that a momentary short (which would be tolerated by a DC controller for a few seconds) causes the DCC system to shut down. This is a supposed case of ‘DCC unfriendly’ points. However, since the shorts were occurring on DC anyway, it is hardly fair to blame the new control system for the fault. The cause of the problem is electrically unfriendly points.
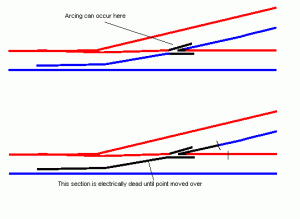
If you refer to the live frog wiring above, you can see clearly where the cause of the problem lies. The open blade of the point is very close to the stock rail, which happens to be at opposite polarity. An older loco with coarse scale wheels, or a wheel which is out of gauge, could bridge this gap and cause a short circuit.
It is sometimes possible to run a layout with points wired this way (I have done in the past) but a better method is shown below. You’ll often see this described as ‘DCC friendly’, but it is equally applicable to DC layouts and is the recommended way to wire live frogs, regardless of the control system.
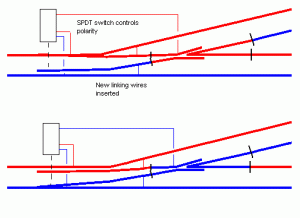
You can see that the point blades are now electrically separated from the crossing, and can be wired to the adjacent stock rail, ensuring the two are always at the same polarity. On points such as Peco code 75, the insulated gaps are there anyway, and one only needs to cut the two jumper wires on the back of the point, and add two new ones. On others such as Peco code 100, you will need to make the gaps yourself and insert pieces of plasticard into the gap. This is however quite simple to do, and is only the same as cutting a length of flexitrack.
With the point blade problem sorted, they are now no longer switching the crossing polarity. To solve this, we use a SPDT switch to do this job. If you are using peco or hornby point motors, the peco PL-13 switch can be attached to the motor. Seep point motors are available with a built in switch.
Note: While I’ve dumped this in to a DCC article with everything else, be aware that this is not a DCC specific technique. It is simply a better way to wire live frog points.
For the n-gaugers, I’m aware that n-gauge points are a bit more fiddly to convert than 00/H0 ones, making this modification more difficult. The clearances between the blade and rail are also that bit larger in scale terms, so you are less likely to get problems with the points left as they are. If you can modify them, do so, but it probably won’t cause many problems to leave them. You can always add just the polarity switch to avoid relying on blade contact to carry power.
Connecting it all up
An example wiring diagram for a basic layout is shown below, and you can see how the basic rule is applied. Note how all the connections are either red or black, and therefore can be joined into a total of two wires (see the ‘two wire’ myth in part 1) On DC control, most of the red connections would have to be separately wired back to individual switches on the control panel. This quickly gets a bit out of hand on larger layouts, but with DCC the wiring remains relatively simple.
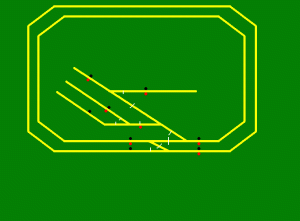
Once you have determined where to place isolated joiners and power feeds, it is time to start wiring it all up. The easiest way to do this is the ‘bus’ method. Rather than wiring each feed to the control panel, we can run a pair of wires along the layout, following the main lines (on smaller layouts, just run it down the middle.) Each of your individual feeds then connects to this central bus. The bus wires are connected to the output of the command station. This is where the simplicity of DCC wiring shows its advantage- the wiring can easily be kept neat and tidy, without a mass of cables all going to one place.
With most entry-level units, a single unit forms a combined controller and booster. This must be fed by its own transformer, and this can usually be bought with the control unit. More advanced controllers often have a separate command station into which the controller (normally a handset) connects. Some have a separate booster as well, but the instructions will show how to connect everything together.
ARTICLE FROM http://www.newrailwaymodellers.co.uk/electrics-dcc-wiring-a-layout.htm